Dubai International Private School: Empowering Minds, Inspiring Hearts, Shaping the Future. مدرسة دبي الدولية الخاصة: تمكين العقول، إلهام القلوب، تشكيل المستقبل
Dubai International Private School: Empowering Minds, Inspiring Hearts, Shaping the Future. مدرسة دبي الدولية الخاصة: تمكين العقول، إلهام القلوب، تشكيل المستقبل
Dubai International Private School: Empowering Minds, Inspiring Hearts, Shaping the Future. مدرسة دبي الدولية الخاصة: تمكين العقول، إلهام القلوب، تشكيل المستقبل


Call us anytime
Elementary School Curriculum Overview
Elementary School Curriculum Overview
The Elementary School curriculum at DIPS-G is aligned with California State Standards to ensure that DIPS-G students master the skills of and are prepared for the 21st century. Teachers, parents, and learners are made fully aware of the standards and the learning expectations, which provide a clear path for learning for all stakeholders. Elementary classrooms provide students with a motivating, caring, and comfortable atmosphere. Students are encouraged to explore their world through real-life experiences. The elementary curriculum is designed to integrate learning between subjects and to the real world and students’ own lives. Various content areas become cohesive through integrating activities that allow students to become clear about similarities between different areas.
The Elementary School program focuses on skills in all subject areas offering higher level skills to challenge and stimulate students in Language Arts, Mathematics, and Science that form the basis of study in the classroom. The Elementary School curriculum also adopts the standards of the UAE Ministry of Education for Islamic Studies, Arabic Language, Social Studies, and Moral Education Program (MEP). Students are prepared for the 21st century through equipping them with the skills that require creativity, problem-solving abilities, and capabilities and readiness for the 4 C’s Communication, Critical Thinking, Creativity, and Collaboration. Elementary students are exposed to inquiry-based approach to learning in everything they learn.
Students are challenged to show their full potential and to progress. Elementary students use technology in learning through using their tablets to interact digitally with their colleagues and teachers; this has increased the level of responsibility amongst students. Additionally, students enjoy learning through STREAM activities where they engage in activities that combine different elements of STREAM; they experience guided inquiry in which they must ask thoughtful questions, discover answers, apply what they learn, and problem solve creatively.
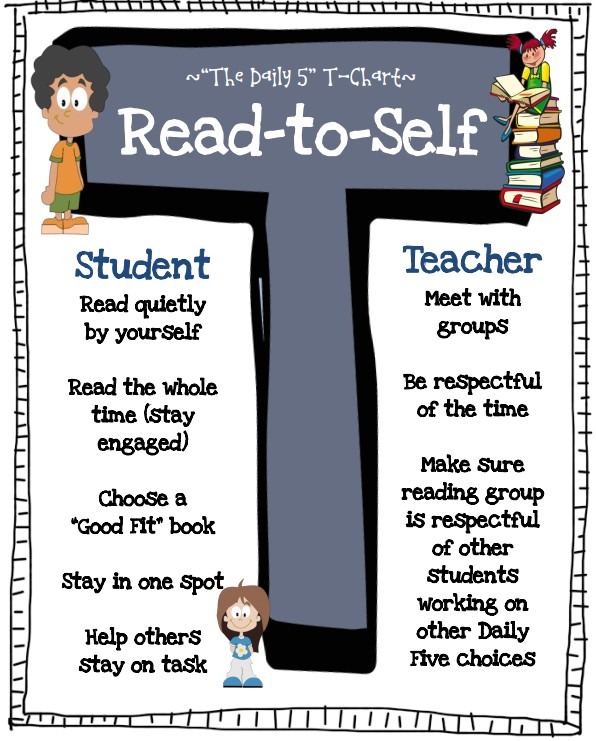
Section I: Read to Self Procedural Guide
Expectations- What do I expect from my students
- State the rules of the Read to Self center
- Create an anchor chart/ bookmarks based on the rules of the Read to Self center (once only when establishing the center)
- Demonstrate how to choose a book and read it quietly (finger rule) and how to fill a Graphic Organizer
- Practice the rules of the center
- Independently pick another story to read and fill the Graphic Organizer
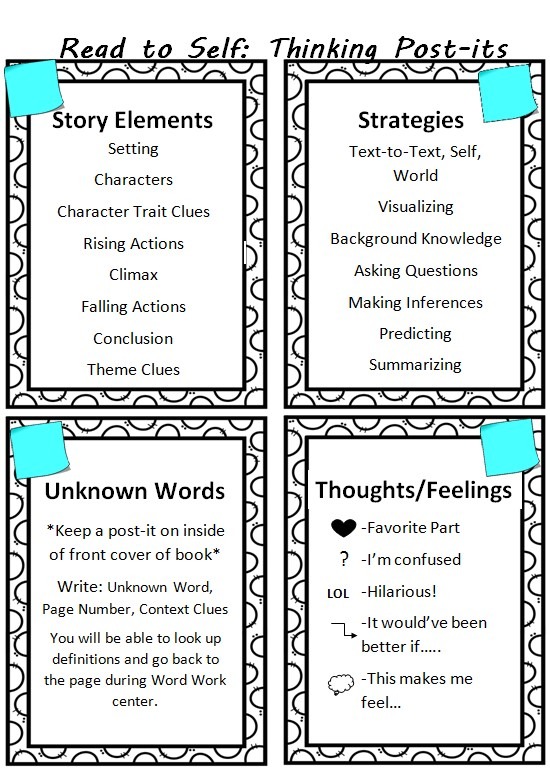
Key Strategies- Creating a classroom full of independent readers with extended stamina requires slow and thoughtful execution teaching the students three different ways to read that encourage fluid practice from the very beginning.
- Read the Pictures: By reading the pictures, even the earliest learners begin to understand the elements of a story.
- Read the Words: By reading the words, the most conventional definition of reading is explored.
- Graphic Organizers: By filling graphic organizers and/or attempting task cards, students demonstrate comprehension of the text.
Physical Environment- What does my classroom physically look like during “Read to Self”
During this time individual students are each equipped with books, seated alone, and reading independently.

Resources- What do I need to SUCCESSFULLY implement this center?
| Book boxes/Red Tubs | Red tubs consist of all Scholastic and Oxford books for their current level and next level |
| Reading Corner | There will be additional books in the Reading corner for every classroom in the Elementary and Middle School |
| Read to Self Notebook | Every student in the Elementary and Middle School must have a file specifically for Read to Self which consists of Reading log, current DRA level, Student –teacher conference sheet |
| Things Good Readers Do | (poster) |
| McREL’s Nine Strategies for Good Reading | Posters to be in the classrooms as Anchor charts to be done with the students in the class. Teacher should teach the good strategies as taking notes etc. |
| RAZ Kids App | Students should read/access to RAZ kids every day. Teacher’s responsibility is to guide and inform students about what level book they should be reading at home on RAZ kids. |
| Graphic organizer | List of all Comprehension skills per grade level. For example in Grade 1: List of sequence/order of complexity classes can’t be doing the same. Every skill, Google sample graphic organizer(or at least 3 different level-3 complexity level)- Easy/Simple, Average, Challenge Every teacher chooses one skill. Sunday: 1st day- Sequence all class(game/activity), differentiated worksheets, 3 levels of activities Monday: Read to self (Reader from Scholastic guided reading) |
| My own dictionary booklet | The school has prepared a booklet called ‘My Own Dictionary’, where the students have to search and find 5 new words online and jot them down in the dictionary. This will allow the students to expand their vocab. |
Purpose:
Through introducing comprehension strategies, you begin to create a classroom environment where all students feel that they can be successful at their own reading levels with books of their choice.
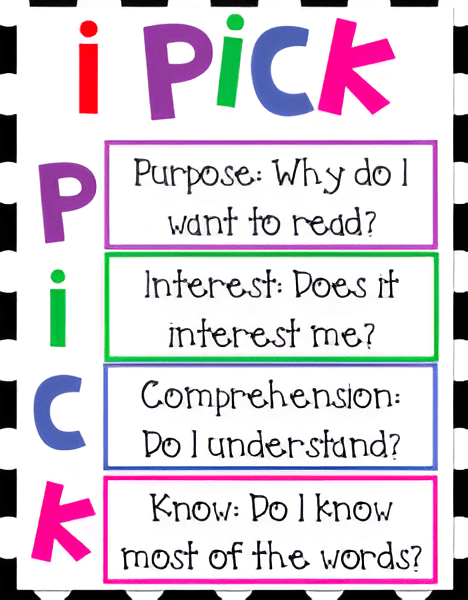
“I- Pick”- Good Fit Books
How?- Equip students with the right books to suit their needs by providing at least 5-6 titles in individual students’ tubs
- Fill the “I- Pick” chart for every student and place it in every students center folder
- Record log/ Reading log
- Reading Rubric
Why?
“I-pick” teaches a student to consider:
- Purpose: Why is s/he reading this book?
- Interest: States students’ interest
- Comprehension: Areas of strength
- Knowledge of words when making their book selections: Word bank to fill out / personal dictionary
Provide quality reading materials
¨ It is expected that you use the Scholastic leveled readers, yet if you have a student in your classroom who is not reading at that level, then they can be encouraged to read from Reading A-Z app.
¨ To integrate technology into this center, RAZ A-Z app can be used. If there is a reader who requires strong reading intervention and who struggles with reading, they may listen to and repeat the story using their device.
¨ Ensure before each and every English period your resources are present and accessible for students to utilize. i.e. For the Read to Self center, graphic organizers, posters and leveled readers must be present. Other resources include (but are NOT limited to) the following:
- Leveled readers to be present in the class
- Individual student baskets/ tubs to be filled with readers for individual students
- Different Graphic organizers in an accessible location in the classroom; i.e. in a box at the back of the class on a table or in an area near leveled readers tub
- Reading books/ Scholastic readers (struggling readers)
- Dictionaries/ tablets
Procedure
Student will…
- Sing the I-PICK song
- Pick a book/text and read silently (Read the whole time, stay in one spot, check for understanding, get started right away)
- Pick a task card from the basket
- Fill in the Read to Self Graphic organizer provided based on the requirements of the task card
- Put materials away correctly
How?- Equip students with the right books to suit their needs by providing at least 5-6 titles in individual students’ tubs
Teacher will…
- Divide students into 4-6 groups based on ability: ( More able, able, less able, struggling & SEND)
Make sure you have a clear chart identifying each student group
- Explain what silent reading is:
( I-PICK, sit by myself, focus on what I’m reading and dive into the book)
- Sing the I-PICK song
- Instruct the students to start silent reading
- Sit with individual students and listen to them read
- Make notes and assess their reading based on the reading rubric
- Ask students to fill in the Read to Self Graphic Organizer provided based on the Read to Self Task Cards
- Circulate room and monitor progress/help students
- Repeat step 4-8. Make sure you sit with students at each table and create an anchor chart with them based on their understanding of Read to Self and teach them the expectations for completing the Graphic organizer.
- Make sure all Read to Self resources (graphic organizer, activities, and questions are placed in Daily 3 Notebook)
Important Guidelines to Teachers
1. Show students one of the following you-tube videos. Discuss what they see in the video based on expectations: https://youtube/SgikvRA8tYg
2. Clearly set the expectations of this center. Students must understand the fact that the time allocated for the read to self center must be independent reading.
3. Student is reading a book that s/he can read at least 3-5 words from each page.
4. Reading with the finger on the book.
5. Student is carefully using the book to make sure s/he does not damage it.
6. Student places the book flat down on the table.
7. Finger Rule – Finger must follow every word being read along with lip reading.
8. After the center time is finished the book is placed carefully in the students’ basket to be continued the next day.
9. Explain the I-PICK rule. Show them a video with the I-PICK song. https://youtube/pNmjXPV_Oko practice this song on a daily basis to drill the importance of the I-PICK + making them more alert for reading before they settle down and implement center rules.
10. Make them practice getting their basket placing it below their table and start reading immediately again and again until they are quick, quiet and on task. Then ask them to pack up and re drill this rule.
11. Finger Rule: When reading, the system expects the student to have their finger placed on the word they are reading. Students should receive a new leveled reader book every week based on the completion of their graphic organizer or product. They should be able to retell the story in oral/ written form. (If a student finishes a book before a week and their work evidences their comprehension, they may take a new story and choose a new activity to represent their understanding).
12. Dictionaries must be present on the tables of the students, in case, they don’t understand the meaning or pronunciation of the word they are expected to independently research, what the word means, and how to pronounce it.
13. Students should use their individual spelling dictionaries, whenever a new word is encountered they should note it down in their spelling dictionaries and try to challenge themselves to use it in their writing.
14. Ensure the leveled readers are sent home with students and keep track of what books go home using Reading Logs.
15. After reading for the allocated time period (using online stopwatch), students are then expected to choose from a variety of tasks to evidence their understanding and comprehension of the story. They are allowed to choose from a variety of graphic organizers placed inside the classroom, create their own project, write a summary, story map and cluster webs based on the comprehension skill for the week. i.e. if the skill of the week is sequencing of events, the student will sequence the events in the outcome of his/ her choice.
16. When filing in the organizer or project, the first thing they do is write their name, date and story title. The students must use pencil to complete their work. Display a graphic organizer on the board. Model the expectations of the handwriting and the neatness expected by the students. Show them an incorrect sample of writing by modeling on the white board and discuss what you don’t want to see. i.e. messy handwriting, incomplete sentences, text copied from the story, unfinished work and sloppy work.
17. Write neatly- no scratching, no lack of organization. (This needs to be modeled by the teacher to ensure the students understand the expectations of the final outcome). Show them what you mean by no scratching.
18. Handwriting must be legible- readable, clean and clear for any person to read and these standards of handwriting must be maintained throughout each and every task completed during the year.
19. Each student has an individual basket in class with their name tag on it. It should contain the Read to Self book + and activity of their choice in it. When the time is allocated for reading, the student should be reading only. They should not be writing or copying from their books.
20. When the time is allocated for the Graphic Organizer or activity, the students should be working and retelling in their own words, they should be attempting to complete minimum one box on the Graphic organizer or one element on their poster per period.
21. Take your time– In no circumstances is the student expected to complete reading the whole book in one session of the center, therefore it is explained to the students that they read and when the time is over they can continue reading from where they left off the next time they return to the Read to Self center.
Section II: Guided Reading
- Video Link: https://www.youtube.com/watch?v=NBy6Bgo7lvg
- Small Group Instruction and Guided Reading are critical components of the reading block.
- Guided Reading is defined as a teaching approach designed to help individual students learn how to process a variety of increasingly challenging texts with understanding fluency. – by Fountas & Pinell
- Small group instructional strategies are made up of similar instruction reading level and learning needs. Guided Reading shows how to develop new strategies to construct meaning from texts.
- Teacher pulls small groups for guided reading while other students are engaged in Daily 3 activities or other assigned literacy work.
- Small group guided reading lessons should be carefully planned in advance.
- In the video, the teacher works with a small group of 3rd Grade students.
Data indicates that these students need support in phonics.
- In the beginning, the teacher guides students in word work.
- The lesson starts with phonics construction using the strategy sound by sound blending.
- In the video, the work with the sound spelling cards and blending has already begun.
- Consistent use of sound spelling cards and whole group and small group instruction support students as they develop problem solving skills for reading and writing.
- Following word work session / center, the teacher begins guided reading with students using leveled texts. Critical text vocabulary is introduced before students begin.
- Following the introduction of key vocabulary, students will go through a picture walk of the selected leveled book.
- Having a conversation with students about the pictures of the story will help them develop a story line about the book.
1st Step: Picture Walk
Teacher asks the following questions:
- What are the characters doing in the picture?
- What do you think they are doing?
- While you are reading the story today, look for words that have “r-controlled” vowels because you will see a lot of these words in the story.
- While you are reading, think about the characters. Who are the characters?
2nd Step: Picture Walk
After the picture walk, teacher:
- sets the purpose for reading including a focus on sound patterns that were introduced and practiced during the word work section of the lesson which targets a comprehension skill that will also be supported during whole group instruction, e.g. Think about the characters, different types of things they do that helps you understand their feelings
3rd Step: During Reading
- Students read the text aloud in a whisper voice.
- Students read at their own pace using skills and strategies to manage texts and problem solve. While students are reading, the teacher is listening to their reading.
- Teacher uses a folder that is divided into 4 sections which represents each of the guided reading groups.
- Teacher uses a sticky note for each student’s name to take anecdotal notes for each reader. She will use the notes to determine teaching points for each student and each group.
- The notes will be moved at the end of week to a binder, which contains a page for each student.
- This binder will continue to help the teacher plan for guided reading so students are increasing reading levels continuously.
- There are a number of ways to note observations during Guided Reading, different methods are used by teachers. Teacher should find a method that is suitable/comfortable for his/her class.
- The important notes are recorded and used to move students to increasingly higher level texts.
4th Step: After Reading
- Teacher discusses and re-visits the texts with students.
- Questions are pre-planned to support the purpose of the text.
- Observation notes are taken afterwards as they will be used to highlight individual student comprehension level and the success of the discussion.
- The important part for the teacher is to know whether students have understood the story.
- Formative assessment will help the teacher plan for whole group and small group instruction as well as for comprehension skills and strategies (Asking questions: What do you think? How does this show? How do you know?)
- The goal of Guided Reading is to teach students to use Reading strategy independently to make meaning from prints.
- The teacher ensures students that they are in the proper instructional group using ongoing observation and assessment data.
Video 2: Guided Reading by the Month- “Just Right Books”
Video Link: https://www.youtube.com/watch?v=-PWmHWAMaaw
Teacher at the beginning of the year sets up routines and procedures for students to become independent readers.
Teacher starts with how students figure out just the right books for them
Example: Teacher chooses Goldilocks to read
Teacher will start reading the book. The teacher will NOT read the whole book or all the captions.
Teacher starts reading the book one page/second page/third page
Then, teacher will stop and explains the 5 Finger Rule:
Students should ask themselves the following questions:
1- Is this book too hard?
2- Is this book too easy?
3- Is this book just right?
Students should choose the books that are JUST RIGHT for THEM. Teachers will not have students read a chapter book without having them understand 5 words. It is not fun to read books that are hard for the students.
Finger Rule
- Hold your fist.
- As you try to read the book, put a finger each time you find a word you don’t know.
- If you get to 5 fingers before you are done with the book, it is too hard.
- Hard words are words you have trouble figuring out or sounding out or you just don’t know what they mean.
- If students read half a page, it is not enough. Students should read a full page to do the 5 finger rule.
Summarize What Finger Rule Is
If you go to a Bookshop and you find a super good book and you are interested in reading it, then you start wondering if it is an appropriate book, start reading any full page.
Apply the 5 finger rule. TIP: If you encounter a word and you figure it out, but you are not sure, that skill counts (even if you think you figured it out but was hard to do).
If you get 5 fingers up, don’t choose the book.
Teacher will ask students to go to the shelves to choose the books.
Teacher asks that when students are done with the book, they put it back placing it well.
Application Part: Just Right Book
While students are waiting for their turn (since not all the students will go at once to the book shelf to choose a book), the teacher gives them two things to do:
1- Reading Interest Inventory: This tells if students like to read and what they like to read. It gives the teacher Information about the student as a reader.
2- Index card: To be used as a book mark. Students will decorate it after they do their reading inventory.
While students are choosing books, teacher is helping and guiding them throughout the process.